Showing posts with label Frosted Designs Fabulous Friday Challenge. Show all posts

Monday, July 16, 2012

MFTWSC80 The Best Things

My Favorite Things has come up with another great sketch for the Wednesday Stamp Club challenge they host on Splitcoast Stampers.


This week's sketch:


And my card:


I pulled out the MFT Vertical Greetings II stamp & die set along with  the Authentique Lively paper pad - I needed to work with bright colors and inspiring thoughts today!

The sentiment panel is stamped with Brilliance Coffee Bean ink, heat embossed and then sponged all over with a little Spun Sugar Distress Ink.

The larger chipboard butterfly (Maya Road?) is covered with Brillance Rust ink and mounted on an oval panel where the sentiment tab is in the sketch.


I covered the smaller butterflies with Smooch and then a thin smear of Worn Lipstick Distress Stickles. They are adhered with glue dots so that one wing is lifted up to give a bit of movement to the design. 

Looking at the finished card, I wish I had used another color for the small butterflies, but then I would have had to figure out what product to use to color them - I only have the one bottle of Smooch {grin}. Time was running out and sometimes you just have to walk away.

Please excuse a little bragging:  I've added a couple of award blinkies to the blog this week. My entry at Frosted Designs won the Washi Tape challenge and I was a runner-up at Really Reasonable Ribbon. It does put a smile on my face to win, but more than anything I really appreciate the blog world for giving a great venue for challenges and inspiration.

Thanks for stopping by,

Jacquie

Saturday, July 7, 2012

Tuesday Trigger & Fabulous Friday

I love days where I have a little more crafty time than expected - my kids are teens, so don't require the same level of direct supervision that was needed a few years ago. Still, our rule is that an adult needs to be home before they can go in the pool with friends. The perfect spot to "supervise" them is from our office, so while I listened to the splashing and frolicking poolside, I cranked out a few more projects.

The Frosted Designs Fabulous Friday challenge this week is to use Washi Tape in a project.

Have I mentioned before how much I love washi tape? I love the translucency of it and am excited to see many paper manufacturers adding washi to their product lines.

I already had my flower dies out and really liked the red/pink/coral colors in this week's Tuesday Trigger at Moxie Fab World, so decided to create another card that could be entered in their challenge as well.

Remember the trigger?


My card:


So where is the Washi Tape?

I started with these tapes from My Mind's Eye Indie Chic Citron Grow (green) and Ginger Pictures (pink) collections.


I layered strips of the tape on scrap pieces of cardstock. Both are layered on white and the pink tape is also layered on yellow, pink and red. Depending on how you line up the strips of tape, you can create different patterns.


My Favorite Things Die-namics were used to cut the flowers (Prima Donna Petals and Hibiscus centers) and leaves (Royal Leaves).

A large Wilton doily and stamp from the MFT Let's Toast die and stamp set round out the supply list.


These close-ups give you a better idea of the color variations from the different cardstocks.


Thanks for stopping by,

Jacquie


Sunday, July 1, 2012

Make It Monday #72 Step It Up - Embellishments

First of all - HAPPY CANADA DAY!!!!

Now, back to our regularly scheduled program  . . . I wasn't sure I was going to squeeze in a post today, but have a few minutes while the rest of the family cleans the kitchen. Don't feel too sorry for them - I've already loaded the dishwasher, put away the leftovers and soaked the really dirty stuff in hot soapy water, so their final cleanup is pretty easy.

I am inspired by a few things today:  the Make It Monday #72 Step It Up video from Dawn McVey at Papertrey Ink and challenge to include handmade embellishments, the Frosted Designs Fabulous Friday Challenge to use circles in a project and a friend of mine that was making flowers with a circle punch on her blog this week.

Here are the cards I came up with all using a circle punch and scrap paper to make flowers.

The first is super simple:


And then slightly more involved:


And finally:


All the sentiments are from the PTI Mega Mixed Messages stamp set and the ribbons are from my stash.

The flowers on this last card are super simple to make. Poke through your scrap paper to find papers of a similar color palette. For these flowers, you really do need to use paper that is printed on both sides. I know some of these scraps are from the Echo Park Victoria Gardens paper pad and at least one is from an Authentique pad.


Gather a couple of circle punches, glue dots and brads.

You will need four punched circles for each flower and these photos show how quick they are to produce.


Once you have the four circles layered together, pinch the top layer into tthe center and expose the colors and layers below. A brad, pearl or gem in the center finishes it off and covers the hole.


You can alternate the papers or alternate which side is facing up, like I did on this flower.


The flowers are then attached to your card front to create a little bouquet.


So, let me know how I did with the challenges.

Thanks for stopping by,

Jacquie


Thursday, June 7, 2012

from hearts to hot air balloons

The Frosted Designs Fabulous Friday challenge this week is to use punches in your design. Check out their blog and play along for great prizes!

I will admit I go to dies more often than punches these days, but have a couple baskets full of punches that like to come out and play.


Splitcoast Stampers recently had a tutorial on what they called a "honeycomb shapes" technique and I decided to use my heart punch to create a hot air balloon.

The smaller balloons are made with a Fiscars heart punch.


I folded the hearts in half with the pattern I wanted to show on the inside.

I then snipped off the bottom of the hearts and started adhering them together.


I put 7 or 8 hearts together to create my dimensional hot air balloon and then adhered the finished balloon to the card front panel.


The balloons will always be open when the card is out, but will close flat for mailing.


The largest basket is made from a heart I freeformed - I didn't have a punch or die the size I wanted (hmm, do I need to go shopping?).

The baskets are also freeformed from scraps and the ropes are just pen lines.

The front sentiment is yet another one from the PTI Mega Mixed Media stamp set and the sentiment inside the card is from the My Favorite Things Vertical Greetings stamp & die set.


All the designer papers are from the MME Indie Chic collections - either Nutmeg or Ginger.

Thanks for stopping by,

Jacquie

Wednesday, May 30, 2012

buttons & micro beads

The Fabulous Friday Challenge at Frosted Designs this weeks is "weddings" and Moxie Fab World has a Damask & Brocade Challenge on their blog, so I've combined the two today to make a wedding card. I encourage you to check out both these blogs for challenges and great inspiration!

There are so many beautiful brocade and damask patterned papers available right now, but I went back to my Echo Park Victoria Garden paper pad - all I can say is, this investment has paid off for me big time. I know I've used the papers on at least 4 cards already in the last couple of months - in fact, there is very little of the paper left :(

I winged it again this week - no sketch to get started.  I poked through my dies looking for shapes that went with the brocade patterns and ended up using a Spellbinders Label 16 die and a My Favorite Things Perfect Bracket Edge Die-namic.


I really did want to keep the embellishments simple, so created a free form heart with pink and white buttons.


Like many of my fellow crafters, I don't love the look of "naked" buttons and started threading them with a linen thread. For the first time, maybe because there are so many buttons, I hated the look of them threaded!?

What's a papercrafter to do, but cut the threads and go to Plan B {LOL}.


I had used Glossy Accents to adher the buttons - I love that it dries so clear and can hold their weight.  I smeared a little more Glossy Accents on top of the buttons and in the spaces between them and sprinkled a few seed beads and a whole lot of Martha Stewart crystal microbeads over the entire thing.

Anyone else have a multi-color pack of the microbeads that rarely sees the light of day in your craft room? It really does feel good to pull out and use some of this product.


I am so pleased with the finished heart!

Instead of more buttons, I colored a couple of white pearls with a Copic marker to finish off the sentiment tag. The sentiment is a stamp from My Favorite Things Clearly Sentimental about Anniversaries collection.

Thanks for stopping by,

Jacquie

Wednesday, May 23, 2012

my kind of quilting

I am back with another quilting card today for the Frosted Designs Fabulous Friday challenge and since this card also has three different patterned papers, I'm going to add it to this week's Papertrey Ink Make it Monday challenge.

I've moved on to making Father's Day cards.


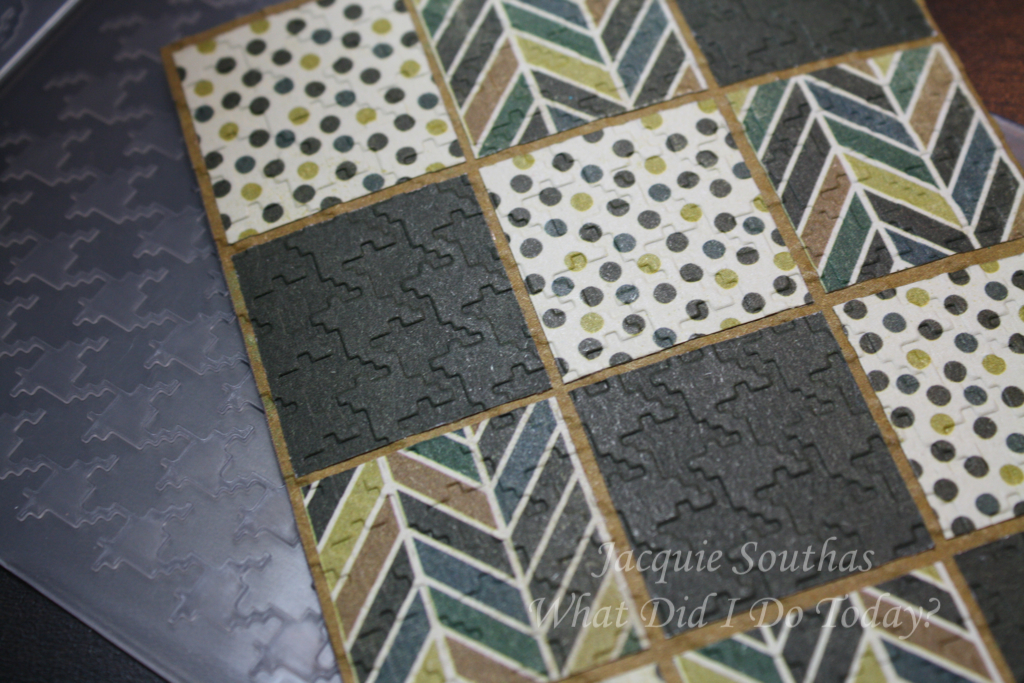
The three papers are from Authentique's Free Bird collection and are cut into squares and mounted on another piece of patterned paper. Not all the papers from this pad looked good together, but these three were pretty easy to match. Both the dark green paper and the base paper do have a very subtle mottled pattern to them that gets lost in the small squares.

Because I wanted to have a complete row of the chevron pattern, the squares are a little over an inch.


Once I had the 3x4 pattern adhered, I trimmed the panel and ran the whole "quilt" through my Big Shot with a cuttlebug embossing folder. I love the way the embossing folder gives more dimension and texture to the panel, mimicing the stitching on a real quilt.


A metal piece anchors the hemp jewelry cord wrapped around the panel and a Tim Holtz charm clip dangles the sentiment tag.


I've really dug deep into old techniques - even an eyelet came out of hiding!

The sentiment tag was made by cutting 2 tags from the smallest Spellbinders Reverse Wonky Rectangle die. One die cut is trimmed along the embossing line and stamped with a sentiment from the PTI Daily Designs Sentiments stamp set.

The tag is adhered with a dimensional adhesive to pop it up a bit and keep it facing the right way.


Thanks for stopping by,

Jacquie


Monday, May 14, 2012

lace it up

A real life crafty friend, Lori (aka The Frugal Scrapper),  is on the Design Team at Frosted Designs, so I decided I'd better check out what they are up to.

This week the Fabulous Friday Challenge is to "lace it up" and I quickly discovered they didn't mean use trim or lace in a project. Head over to their blog to see the details.

I wanted to catch up on a couple of the MFTWSC sketch challenges that I missed, so created a card based on this sketch and the lace it up challenge.


All the designer paper is from either Echo Park This & That Graceful or MME Miss Caroline Dolled Up.


The sentiment is from the MFT à la mode Birthday Girl stamp set and is stamped on one of the Mini-Tab Die-namics (also MFT) that I cut two of and layered. 

Now we are getting to the "lace it up" challenge. I have some beautiful lace tape that I wanted to use and "lace" a ribbon through it to fulfill the requirements for the Frosted Designs challenge.


As always, I have to look at a couple of options before making a decision. I thought the chiffon ribbon would be too pale, the satin ribbon wasn't the right shade of pink and the Baker's Twine seemed too rustic. Turns out the chiffon ribbon was just right - showing up against the lace tape beautifully.

You can see in these photos how simple the lace tape is to work with - the backing just needs to be peeled off when you want to use it on a project.


I like to use a tapestry needle to thread things like this - it is sturdy, has a huge eye and a blunt point. A bit of adhesive will stick to the needle, but clean up is fast with a wet wipe.


I threaded right through the backing, but it is easier to remove if you thread between the backing & the lace {learning as I go}.


Have I mentioned how easy this lace tape is to use yet? {grin}

It lies nice and flat with no extra drying time on the finished card and, best of all, there are no bits of glue sticking through the holes of the lace!

My last step to finish the card was cutting two circles using a Memory Box die. As you can see, they are offset and adhered together with a glimmer misted Prima flower on top (yes, peeps - I glimmer misted!).


Thanks for stopping by,

Jacquie