Sunday, September 30, 2012

MFT Guest Design Team October 2012

Can you believe it? My dear daughter needs another birthday card. To be honest, I love that she asks me to make cards for her and I know that her friends love the My Favorite Things a la Mode girls as much as I do.


I used the MFT Guest Design Team sketch for October as my starting point - I love the shape of this banner die! Details of the Guest Design Team challenge can be found here at Splitcoast Stampers.


I don't usually take photos in such bright sunshine, but just could not get good enough light anywhere else today. I guess the advantage of full sun is the glimmer in the sheer yellow ribbon comes through, along with the glossy accents on the glass of sparkling, non-alcoholic cider {what? you thought it was champagne? not this time}.


The ALM Cheers stamp is colored with Copics and the dress paper pieced. All the designer paper on this card is from the My Mind's Eye Happy Day 6x6 pad. The edges were inked with Spun Sugar Distress Ink. I borrowed a birthday sentiment from MFT's Who's That Girl Birthday stamp set and trimmed the sentiment tag to mimic the rounded banner shape.

At the base, a velvet scalloped ribbon is layered under a MFT Squiggly Border die-namic.


A fushia sheer and yellow wired, sheer ribbon are layered under the main panel and a double loop bow finishes of this side of the card. Did you notice how the yellow & pink chevron paper line up? Took a few minutes to make that work, but it just looked wonky when I didn't do it.


A few pieces of patterned paper and another sentiment from the WTG Birthday set finish the inside of the card. The Dainty Dots border was cut for the front of the card, but I didn't like the chevron showing through the open loop, so switched it out for the Squiggly Border.

Thanks for stopping by,

Jacquie


Saturday, September 29, 2012

Make It Monday #84 - Reflected Sentiments Take Two

I had a little more fun with the Papertrey Ink Make It Monday #84 Reflected Sentiments challenge this morning. Check out Betsy Veldman's video here for a great demonstration.


This time I used a sentiment from PTI's Birthday Bash Sentiments stamp set with VersaMagic Mango Madness chalk ink. I only wanted to reflect "celebration", so masked the other words when I inked the stamp the second time.


The designer paper is from the My Mind's Eye Life of the Party line, PTI buttons and twine from my stash.


Thanks for stopping by,

Jacquie


Thursday, September 27, 2012

Make It Monday - Reflected Sentiments

Oh, do I ever love this technique!

On the weekly Make It Monday challenge for Papertrey Ink, Betsy Veldman shared a very cool way to reflect a sentiment stamp. Her video here demonstrates how to do this beautifully.

This is my first attempt:


I used one of the sentiments from the PTI Thanks All Ways stamp set with Memento Rhubard Stalk Ink. I really like that only the two outside letters actually touch.

Here is a close-up of the embellished corner - I tied fiber to a sheer ribbon bow and then tucked in a little bouquet of paper roses.


If you saw my post yesterday, you might recognize the PTI Happy Harlequin cover plate die in the background. These were the pieces left over, because I only needed the center diamonds for that card.

I had only used part pieces of scrap paper when die cutting, but loved the color palette and played around to see if I had enough to create a background. Don't look too closely, or you will see my edges are not perfect, but I hadn't planned on using the scraps. Next time I'll know to be more careful {snort}.

I am also linking this card to the Colour Q challenge #156.


Thanks for stopping by,

Jacquie


Wednesday, September 26, 2012

Fall themed Cas-ual Friday & Colour Q Challenges

Well, it doesn't feel much like Fall around here, except maybe the nights are a little cooler. The leaves are turning - yes, that even happens in Southern California - but it will be a few months before sweaters and boots are pulled out of hiding.

For now I will have to get my Fall fix by playing with paper & ink in the gorgeous colors of the season. Some of my favorites are in this week's Color Q #156.


I combined this color palette with the CAS-ual Friday Challenge 71  to create a Fall inspired project.


CFC71 Create a Clean And Simple project inspired by autumn

And came up with this card.


The diamond pieces were cut from pieces of scrap patterned paper (My Mind's Eye, Authentique, BoBunny) using the Papertrey Ink Harlequin coverplate. I arranged the pieces along the left side and played with the composition (for far too long) before starting to adher the pieces. 

I find it incredibly hard to create clean & simple cards and am in awe of the beautiful inspiration on the Cas-ual Friday challenge blog!

The sentiment is also from PTI and stamped with Memento Toffee Crunch ink.

Thanks for stopping by,

Jacquie


Tuesday, September 25, 2012

Papertrey Ink September 2012 Blog Hop Challenge - Wine Gift Bags

When I first saw the PTI Blog Hop Challenge this month, I knew immediately that I was going to pull out the sewing machine and finally make a few fabric wine gift bags. The details of the challenge are on Nichole Heady's blog and this is the inspiration photo.


9-25-blog-hop-challenge


When the glitter settled from an epic couple of months making musical theater costumes for dear daughter's school I was left with a piece of heavy white canvas (denim?) that I thought might be useful in my crafty endeavours one day. 


I had enough canvas to make 8 bags, so have a few more to do, but I LOVE the way these turned out! 

If you have sewn a straight line before, you can whip these up pretty fast.

I used 12x18" rectangles, sewed the patterned fabric to the canvas first (right sides together leaving a gap on the bottom), flipped them right sides out and ironed the rectangle.  A channel was sewn for the pull cord (or ribbon) about 3" from the top edge - I picked out the stitches for the opening after this channel was finished. On one of the bags I added a line of gathered tulle - still debating whether I like this or not.


Because 2 of my fabrics had text on them, I was careful to make sure the text would read the right way when the top of the bag was turned down.

With the patterned side out, I folded the rectangle in half and sewed the bottom edge and side up to the cord channel, creating my bag. A different ribbon or cord is used for each bag and bells are tied on the ends of a couple - star or snowflake charms would be great too.

I used my ancient Making Memories foam stamps to print the sentiments. This was probably the toughest part - I had no back-up plan for any stray paint.


My plan was to make matching gifts tags using the new PTI Happiest of Holidays stamp set, but the PTI package is still somewhere between here and there, so I shifted gears quickly to plan B.

I will definitely be making a few more of the HAPPY bag, because it is the most versatile sentiment. What was going to be a Happy Holidays gift bag is now Happy Birthday! 


One of the PTI Half & Half dies is used to create a base for the sentiment from the PTI Movers & Shakers stamp set. The tag is made by running a piece of cardstock through the Xyron and laying the fabric on top of it. The excess fabric trimmed away and the corners rounded to mimic the Half & Half die.


A few rhinestones colored with a Copics and a piece of chiffon ribbon finish off the gift tag.

When my new stamps arrive, I will be making tags with them and scraps from these text fabrics.


I still can't decide whether or not I like the line of tulle on this bag.


I am off to check out what everyone else has linked to the Blog Hop.

Thanks for stopping by,

Jacquie


Saturday, September 22, 2012

Repetition Challenge

I've been wanting to play with the Papertrey Ink Mega Vases dies ever since they landed on my desk, but for some reason they didn't make it to the top of the pile until this morning.


I love, love, love the shapes of these vases. For today they aren't filled with flowers because I wanted to highlight the shapes and play with patterned paper.

I love a fast simple card! The papers are all from My Mind's Eye The Sweetest Thing Bluebell pad, the sentiment is PTI, the Spanish Olive ink is VersaMagic and the card is finished with a strip of lace tape.

I am going to enter this card in two Moxie Fab World Challenges - the Tuesday Trigger: Envy Becomes You (see below) because of the color palette (blue & green) and the Repetition Challenge. The vases shapes may be different, but there is a definite repetition of the object.


Thanks for stopping by,

Jacquie


Friday, September 21, 2012

Tuesday Trigger - Envy Becomes You

I loved the greens & blues in the current Tuesday Trigger from Cath at Moxie Fab World. Who doesn't love these shoes?!


As you can see, the colors & the bow inspired my card design:


The sentiment & die are from the My Favorite Things Vertical Greetings set. The quote is stamped and heat embossed with Brilliance Pearlescent Sky Blue, so it has a glimmer to it.

The designer paper is from the Lily Bee Designs Memorandum Tiny Tablet and the green cardstock is embossed with a Cuttlebug folder. A knotted ribbon bow finishes everything off.

There is still time to play along and see what creation the photo triggers for you!

Thanks for stopping by,

Jacquie


Wednesday, September 19, 2012

Last Card Standing and RRR Autumn Challenge

I have a piece of red jute ribbon that has been sitting on my desk begging to be used. The basket of apples digital stamp from Taylored Expressions was sitting next to it and I had in the back of my mine the Really Reasonable Ribbon Challenge #56 Autumn Colors & Ribbon.

Taking those three things, I came up with this:


I printed the digital stamp four times - first to create a base and then with a few paper scraps to paper piece the apples & basket. I don't know about you, but I find paper piecing to be very theraputic.

I fudged the oval die cut a bit to get the "farmers market" from the designer paper where I wanted it, knowing the sentiment flag would cover the top of the oval.

A Tim Holtz memo pin holds the sentiment flag in place.

This card is being entered in the Taylored Expressions Last Card Standing competition and RRR56.


Thanks for stopping by,

Jacquie

Tuesday, September 18, 2012

Taylored Expressions Last Card Standing

Have you heard?! Taylored Expressions is having a card making competition. Being a fan of reality TV (everyone needs a guilty pleasure, right?), I knew immediately what Last Card Standing was about, but you can read the details on Taylor's blog or at Splitcoast Stampers.


Taylor has graciously provided a number of digital stamps so everyone can play along!

I chose to work with this Wreaths of Joy image and paper from the Authentique Festive 6x6 designer paper collection (also available from Taylored Expressions).


The digital image is paper pieced by printing it first on a cream distressed piece of designer paper, then on green and then on red designer paper. The wreath is trimmed to mimic the fabulous die that TE carries. A little stickles on the ornaments finished the wreath off.

A piece of gathered tulle pokes out the bottom of main die cut panel and it is mounted on a slightly larger die cut. The edges are inked with barn red and peeled paint (green) distress ink.


I am also entering this card in the Moxie Fab World Movement and Asymmetry Challenges. I deliberately placed the vertical panels off center as I think the bird on the wreath needed space and something to look at to the right. The position of the bird pulls the eye down to the trio of buttons in the bottom corner.

Thanks for stopping by,

Jacquie

Sunday, September 16, 2012

Halloween Banner

Whenever anyone ask my dear husband or I why we live in Southern California, we almost always answer "the weather", so please indulge me while I whine about how stinking hot it has been!!!!

I truly love where we live, but the average high temperature this time of year is supposed to be a 73 and what we are experiencing is over 100?!

I have retreated to the office and pretended there is a chill in the air as I played with Halloween themed paper and created this little banner. My camera problem has been pushed to the back burner for a couple of weeks, but my frustration at getting a good photo today means I am determined to resolve this issue by the end of the week (maybe an early, early Christmas present?).


This project started after I had dinner last week with a few crafty friends. One was giving away a banner style mini-book she received at the La Jolla CKU Reunion last year. Hmmm . . . . I wondered where the one I had was hiding?

I went home and found mine - a fishtail flag style banner book from Fancy Pants. For the first time in ages I bought 12x12 paper: the banner pieces are 8x5, so a small pad wasn't going to do the job. These papers are from the Authentique Enchanted collection.


A few friends might just faint in shock when they find out I used my Cricut to cut the letters. My Cricut also came home from CKU with me. Yes, I won one of the big door prizes!

I did play around a bit with the Cricut when it first came home, but have truly never used it {sheepishly hanging head}. It is not that I didn't appreciate the value of such a great prize, it is because I really have been happy with my Big Shot and multiple brands of dies and didn't feel the need to buy an electronic system.

Now back to the banner and a few close-ups to show off the details.


Each letter is adhered to a open scalloped circle cut with a Spellbinders Nestabilites die and then mounted on a large rosette. I don't have a die for this, so just scored lines at 1/2" intervals - the rosette is made up of two 1x12" pieces of patterned paper.


The epoxy bat stickers and jeweled ghost came from my stash of Halloween themed product. It was fun to look through and a nice surprise finding the ghost fit perfectly in the center of the "o".


I adore this May Arts pompom trim and alternated the orange and black on the banner pieces. The banner is strung together along a piece of black tulle and orange organza ribbon that I knotted between each piece.


The black and clear rhinestone swirls are all bits and pieces from my stash.


I'm not sure where this will hang - the fireplace for the family to see or the front window with a string of ghost lights.

Thanks for stopping by,

Jacquie


Thursday, September 6, 2012

Colour Q #153 and Sweet Sunday Sketch Challenge #166

The dear children are back at school and I am finding it hard to get anything done during the day - what's up with that?

I did finally make myself get crafty this afternoon when I looked at the Colour Q Challenge #153 palette for this week and realized most of the colors could be found in the My Mind's Eye The Sweetest Thing Lavender designer paper pad sitting on my desk.


Yes, the color palette includes a coral, and I used the lavender pad {lol}.

I needed more of a creative push, so looked at Karen Giron's sketch for the Sweet Sunday challenge and came up with this.


The sentiment is from one of my favorite stamp sets from My Favorite Things: Vertical Greetings II.

A circle punch, couple Nestabilities dies, Martha Stewart butterfly punch and twine round out the supplies.

Thanks for stopping by,

Jacquie


Monday, September 3, 2012

MFTWSC87 Make a Wish

We have enjoyed a nice, quiet long weekend dogsitting our beautiful little friend once again. It was hot and the dear children enjoyed helping Bella cool off with a ice popsicle.


My dear daughter did give me a few days notice that she needed a birthday card for Tuesday, but I forgot about it until late this afternoon. Thank goodness the sketches from My Favorite Things  take some of the thinking out of the creative equation.


Here is the finished card:


I used papers from the Echo Park Everyday Eclectic paper pad, along with the Birthday Girl a la Mode stamp set from My Favorite Things. Several MFT dies round out the supply list: Open Bracket Border, Loopy Bloom and Mini Tab Quartet. The loopy bloom is made from crepe paper and finished with a My Mind's Eye brad.

The inside of the card is finished with a few flags from the paper scraps and the negative of the Open Bracket Border.


On a completely different note, a movie I have wanted to see all summer is Moonrise Kingdom - we almost missed it in the theatre, but  were thrilled to find it still playing last night. The entire family LOVED it and I can guarantee it is going to be added to our select collection of DVDs.

Thanks for stopping by,

Jacquie

Saturday, September 1, 2012

Make It Monday #80: Making Garlands

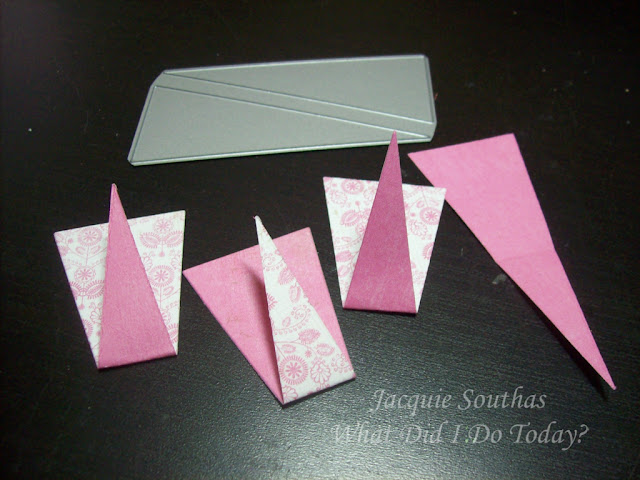
I made a card last week using the Papertrey Ink Hello Sunshine die to make a banner, so when I saw the Make It Monday challenge and video by Ashley Cannon Newell was to make a garland,  I decided I wanted to play around with this die a little more.


A scrap of paper from the Authentique Lively pad was sitting on my desk, so I started by cutting 4 panels and folding the pointed end up to see how the pattern would look.


I really liked this, so ended up running a 1/8" strip of adhesive tape about 1/8th of an inch below the top of the triangle. I adhered a piece of thin ribbon along the top of each panel. A glue dot on the buttons is holding the tip of the triangle down.

Once I stamped my sentiment from the PTI Thanks All Ways stamp set and embossed the card base, I adhered the ribbon at the back of the panel. The garland pieces and ribbon are not adhered to the front of the embossed panel - they are hanging loose.

Another sentiment from the same set was stamped on a fifth die cut and adhered with dimensional foam adhesive to lift it above the base.


I wasn't really feeling the card was finished, so ran a thin line of Stickles along the garland pieces and the triangle sentiment die cut.

Because I like the way the triangle sentiment panel is pointing to the "thanks", I am also entering this card in the Moxie Fab World Movement Challenge.

Thanks for stopping by,

Jacquie