Pages

Monday, March 31, 2014

Muse #61 Guest Designer

I was both thrilled and terrified when Ardyth invited me to be the Guest Designer at the Muse Card Club this week. I love checking the Muse blog every Monday morning to see what the new inspiration card is for the week. Even when I don't have time to make a card myself, I always participate in the voting for my favorite three cards in the gallery.


This birthday card is made with a few favorite dies - the "happy" is from My Favorite Things, the "birthday" is created from the Papertrey Ink Headline Alphabet and the streamers are from a Memory Box Ribbon Candy border die. This all sits on a Soft Stone panel embossed with a Paper Studio star embossing folder. 

I'd love to see what inspires you - the theme? the colors? the texture? I really hope you are inspired to play along over at the Muse!

Thanks for stopping by,

Jacquie


Saturday, March 29, 2014

CTS #70 + Merry Monday #101 & Craft Hoarders Anonymous #4 + Card Concept #6 & FMS #129

I have a trio of cards to share today. This first one was inspired by the CAS(E) this Sketch! #70 and I think you can see I took Sam Simpson's sketch very literally.


I used Distress Inks to color the background sky panel and the border die cut foreground. After inking, I spritzed water to mottle the colors a bit.


The foreground panel is popped up with a very thin foam adhesive and then the whole panel is adhered to the card base with a thicker foam square.


For this next card I took inspiration from The Card Concept #6 and Freshly Made Sketches #129.


My card follows Clean & Layering style, with the embossed panel inspired by the white cake & the double scalloped senitment panel by the cake plate.


This final card is for the Craft Hoarders Anonymous Challenge #4 and Merry Monday #101: Grey, Red  & White challenge.

Craft Hoarders Anonymous Inspiration Photo
Sparkle, Glitz & Glam


The wreath image is stamped and embossed with silver embossing powder and a few of the berry dots are touched with red stickles. 


The white panel is attached to the card base with the white glitter tape, so it has a swing and movement to it that I really like.

Thanks for stopping by,

Jacquie

Wednesday, March 26, 2014

Muse #60+ AEI♥︎U #3 Ombre/Gradient

When I saw the card from Lyndal Higgins for the Muse Challenge #60, with the stenciled white trees and dramatic inked background, I was reminded of a card by Karen Walker that I had pinned a few weeks ago (you can see Karen's card here). Both are sympathy cards that involved white trees.


Muse #60 by Lyndal Higgins 


Unfortunately, I am in need of a few sympathy cards with the passing of a family patriarch last weekend. The Seattle branch of the Southas family welcomed us with open arms when we moved to that area years ago. For seven years we enjoyed many happy events, including the big, fat Greek Christmas & Easter celebrations - even occassionally luring them over to our home on the Eastside (it is not easy to get a Seattleite to cross Lake Washington).

My husband, having lost his dad a couple years earlier, had a close bond with Pete and was always receiving little gifts from him. Just before we moved to California, Stefan came home with Pete's John Wayne movie collection. I have to smile, because this isn't a DVD collection - no, this is a box of VHS "recorded off the TV" movies. We don't have a VHS player anymore, but the box of tapes is still in the garage :)

Oops, you were here to see a card.


I masked part of the card base and blended three Distress Inks (Shabby Shutters, Tumbled Glass and Weathered Wood) working from a light color in the center out to darker edges. The white MB Arboscello Tree was adhered to the inked panel and then I held my breath while stamping the Avery Elle sentiment on the card base, working it carefully over the tree trunk.

I am linking this card to Avery Elle's AEI♥︎U Challenge #3 - Ombre/Gradient and the Avery Elle May Guest Designer Search.

Challenge 3


I want to give a shoutout to Southwest Airlines for helping us a reasonable airfare to Seattle this weekend. No one seems to offer bereavement fares anymore, but Southwest found us a seat at half the price we were able to access online and we are grateful for that. Thanks for indulging my little tribute to Pete.

Jacquie


Tuesday, March 25, 2014

Papertrey Ink March 2014 Blog Hop

The challenge for the Papertrey Ink March 2014 Blog Hop is to incorporate something high gloss into a papercrafting project. You can check out all the details here at Capture the Moment.

Blog-hop-logo

March-Blog-Hop-Inspiration


I pulled out my long neglected bottle of Glossy Accents to highlight the balloons on this birthday card.


The "happy" die was cut twice from white cardstock and once each from Summer Sunrise and Hibiscus Burst and adhered together. The "happy" is also die cut from the stamped panel and adhered to the top of the stack (taking care not to lose the little pieces from this die cut).


I covered all the balloons with Glossy Accents - the panel, the stamped "happy" die cut stack and the little pieces - and left them to dry overnight.


The next day I assembled the card by first attaching the stamped panel to the card base, then fitting the "happy" stack in the negative space and finally adding back the four little pieces (center of the "a" and center of the loops from the "p" and "y").

A few rhinestones were scattered around the panel to finish off the card.

I can't wait to see everyone's glossy creations!

Thanks for stopping by,

Jacquie

Monday, March 24, 2014

Make It Monday #157 DYI Cover Plates

I think this is the quickest I have made a card for the PTI Make It Monday technique challenge. Betsy  Veldman has a couple of great examples in her tutorial for DYI Cover Plates - you can see the MIM #157 tutotial here. 

Since the Leave It Be stamp & die set was sitting on my desk, I put them to work creating a fast and easy card.


I used a little tape to hold the die cut panel to the white card base while I stamped the leaf images. Once it was all stamped, I removed the tape and adhered the panel with foam squares.


I hadn't thought too much about where or how I would add a sentiment, so followed Betsy's lead and used the same "thank you" die.

Thanks for stopping by,

Jacquie

Sunday, March 23, 2014

MIM #156: 3D Stamp Paint Techniques + Seize the Birthday

I played around with the Make It Monday #156: 3D Stamp Paint Techniques from Melissa Phillips on and off this week. You can check out the tutorial here, although time is rapidly running out to link a card.

I didn't have the same, thick paint that Melissa used so played around with paints that ended up being too thin or splotchy. Not all the panels were usable, but these two were the best of the week's work.


The first panel was made using a painted Herringbone Impression Plate and the coverage was so complete I thought I had a Ripe Avocado panel. I distressed the edges to add a bit more texture.


I then used a thicker paint with a houndstooth embossing folder and was happier with the variation in coverage. This panel I die cut into circles and randomly layered over the other panel.

A sentiment from Birthday Bash Sentiments finished the card off.

I'm also linking this card up to the Seize the Birthday Anything Goes challenge.


Thanks for stopping by,


Saturday, March 22, 2014

Muse #59 + Simon Says Glitter It

I've had one of those days where the cards in my head have not translated well to real life, so have left a nice mess behind in the office to post the only card that sort of worked.

I love the repeat of the die cut on Marion Vagg's card for Muse #59.


The top two "happy" die cuts are inlaid, the next line is adhered to the card front and, on the third line, two die cuts are adhered together to add a little more dimension.


The "birthday" die is cut three times for even more depth and the final set of "happy" dies is just one cut adhered to the card front.


All the words are brushed with a clear Wink of Stella to add a perfect touch of shimmer.


I'm also entering this card in the Simon Says Stamp Wednesday challenge to Glitter It.


Simon Wednesday Challenge Blog


My poor husband is trapped at the Nascar race this weekend, so I get to spend my Saturday night playing with paper, ink and paint.

Thanks for stopping by,

Jacquie


Thursday, March 20, 2014

OCC Clean & Simple 3 + Fusion #6 + CTD#284 + CTS#69 + MFW Stencil + SSS Glitter


My apologies up front for so many cards in one post - all of these are based on techniques from the Online Card Class Clean & Simple 3: One Layer Cards and some have incorporated the sketch or color palettes from other challenges.


This first card uses dies to emboss the square on the card base and make a stencil from acetate. The stenciled image was inked after the modeling paste dried.


The embossed square made it easy to create the glitter frame using 1/8" adhesive tape and loose glitter. This card is being entered in the Fusion #6 challenge, Moxie Fab Word Styling With Stencils challenge and Simon Says Stamp Wedesday challenge Glitter It.


Simon Wednesday Challenge Blog


My next card use a few techniques I still feel very challenged to get right - coloring with Copics and using spray mists.


My favorite element is the Viva Pearl Modeling Cream that is used to stencil the stars. I moved the stencil around the panel, learning the hard way I needed to patiently wait for one set of stars to dry before adding another.


Don't you love the shimmer of the pearly finish? This card is also being entered in the Moxie Fab World: Styling with Stencils challenge.


I immediately thought of using the Color Throwdown #284 colors when I saw this geometric inking and embossing technique.


Dusty Concord, Broken China and Peacock Feathers Distress Inks were as close to the CTD colors as I could get. I will definitely look for something to give me narrower masked lines between the shapes next time - 3/8" washi tape was the thinnest I had on hand.

Are you still with me? This is another masking technique and comes close enough to the CAS(E) This Sketch!#69 that I will enter it in the challenge.


The flower images are from the same AE Oh Happy Day stamp set as the sentiment - this is probably the first time they have seen ink.


Finally, here are a few cards that I'm posting just to link to the Online Card Class gallery. I mentioned in the Forum I was having trouble getting an even impression along the sides of the card when trying the selective embossing technique. As you can see, there is barely an impression on the right side of the sentiment panel.


This is the same technique, but came out with a more even impression. The inked card front is a bit of an experiment - not sure if I like it or not.


For my last card, I played with one of the color techniques - fast, clean and simple as long as the die cuts are straight :(


Most of these cards will be filed in a "technique box" and act as references when I'm looking for inspiration in the future.

Thanks for stopping by,

Jacquie


Tuesday, March 18, 2014

Belated Birthday Wishes + OCC Clean & Simple 3

I'm linking this card up to a Surprise Belated Birthday Party hosted by Darnell and Bev for Anita of My Papercraft World. Bev has the food & festivities at Happy Dance and Darnell is providing the linky party so you can join in the celebration and wishing Anita a wonderful (belated) birthday!


Anita is a master of Clean & Simple cards, often using wonderful bright colors, so if seemed fitting to use one of the masking techniques from the Clean & Simple 3 OCC to make room for a birthday sentiment in the midst of the flutter of butterflies.  I hope you enjoy the surprise Anita!


I am slowly getting caught up on things after disappearing on a four day crafty retreat. This is what I took with me and I'm having trouble fitting it back in the office.


About half has been put away and the rest is stacked in the hallway, but, since it is my very patient husband's birthday today, I am determined to squeeze it all back where it belongs.

Thanks for stopping by,

Jacquie


Sunday, March 16, 2014

Craft Hoarders Anonymous #3 & Muse #58 & Freshly Made Sketches #127

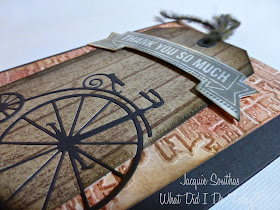
I'm making a quick post to squeak in under the wire for a couple of challenges. This first card is for the Craft Hoarders Challenge #3: Vintage or Retro.


The Memory Box die cut is inlaid onto the wood plank tag and then rested on a brick embossed panel.


This second card is inspired by Therese Calvird's Muse #58 card and Freshly Made Sketches #127.


I love the red bicycle stamped on the wood veneer, but without a modern bicycle image, it took a bit of pondering to come up with my card.


 I kept coming back to this scooter paperclip and when I saw FMS127 I knew I could make it work. The color palette and wood plank stamped tag were inspired by Therese's card.


Thanks for stopping by,

Jacquie