Pages

Wednesday, May 30, 2012

buttons & micro beads

The Fabulous Friday Challenge at Frosted Designs this weeks is "weddings" and Moxie Fab World has a Damask & Brocade Challenge on their blog, so I've combined the two today to make a wedding card. I encourage you to check out both these blogs for challenges and great inspiration!

There are so many beautiful brocade and damask patterned papers available right now, but I went back to my Echo Park Victoria Garden paper pad - all I can say is, this investment has paid off for me big time. I know I've used the papers on at least 4 cards already in the last couple of months - in fact, there is very little of the paper left :(

I winged it again this week - no sketch to get started.  I poked through my dies looking for shapes that went with the brocade patterns and ended up using a Spellbinders Label 16 die and a My Favorite Things Perfect Bracket Edge Die-namic.


I really did want to keep the embellishments simple, so created a free form heart with pink and white buttons.


Like many of my fellow crafters, I don't love the look of "naked" buttons and started threading them with a linen thread. For the first time, maybe because there are so many buttons, I hated the look of them threaded!?

What's a papercrafter to do, but cut the threads and go to Plan B {LOL}.


I had used Glossy Accents to adher the buttons - I love that it dries so clear and can hold their weight.  I smeared a little more Glossy Accents on top of the buttons and in the spaces between them and sprinkled a few seed beads and a whole lot of Martha Stewart crystal microbeads over the entire thing.

Anyone else have a multi-color pack of the microbeads that rarely sees the light of day in your craft room? It really does feel good to pull out and use some of this product.


I am so pleased with the finished heart!

Instead of more buttons, I colored a couple of white pearls with a Copic marker to finish off the sentiment tag. The sentiment is a stamp from My Favorite Things Clearly Sentimental about Anniversaries collection.

Thanks for stopping by,

Jacquie

Monday, May 28, 2012

man-tastic

Love that description form Moxie Fab World for their Tuesday Trigger this week: man-tastic!

This is the inspiration photo:

As soon as I saw this photo, I thought of the stash of chipboard petals I had. These came in a big chipboard set that I received many years ago - I've wondered why I hold on to them, and now I know LOL.

My card came together very quickly - just a peak at my work in progress.


I had a grey paper in my original plan, but didn't like the way it looked with the other, richer colors. 

My final card is another one for father's day - both dear kids have laid claim to this one!


Most of our weekend was spent installing a new patio - so happy with the way it looks!

Thanks for stopping by,

Jacquie


Sunday, May 27, 2012

happy mail

For this week's MFTWSC sketch challenge  at Splitcoast Stampers I inked up a Pure Innocence stamp from My Favorite Things called Happy Mail.

Isn't she cute?


How did I do following the sketch?


Happy mail deserves some happy colors, so I picked papers from a couple of MME Lime Twist designer paper pads: Life of the Party and Out of the Blue. 

The flowers were created from by combining a few different MFT dies (Mini Rolled Roses and Pretty Rosies) and I used my new chevron die to make the horizontal panel in the middle of the card.


The pearl centers come from my stash.

You can see the stamped and paper pieced image is cut out and mounted on the top panel. Foam adhesives were used to layer the elements to give the card a little dimension.


Hope you are enjoying a great weekend - we just got back from participating in a local 5K run/walk and haven't decided what to do with the rest of the day. My dear son ran it last year & I promised to do it with him with this year, so signed up dear husband and dear daughter as well. Most weekends, dear daughter would not be out of bed yet!

Thanks for stopping by,

Jacquie


Friday, May 25, 2012

I really do love Love My Tapes

Please indulge me while I brag a little. Do you remember this post?

Featuring this card?


I created it for the Frosted Designs Fabulous Friday Lace challenge, which won me the Top 3 button blinking away at the right.

At the last minute I decided to also enter it in the Love My Tapes May challenge, which was to make a birthday card, and I found out this morning that I WON!

Woohoo!

Everything I said about this lace tape is true - a dream to work with and I LOVE that it is adhesive backed, so no messy glue/tape coming through the holes as you try stick it down.

Love My Tapes carries a great selection of washi, lace and fabric tapes that can be bought directly from them or a number of other outlets (a list is on their blog).

Thanks for stopping by,

Jacquie


PTI May Blog Hop Challenge

Hi & welcome to the PTI May Blog Hop Challenge!

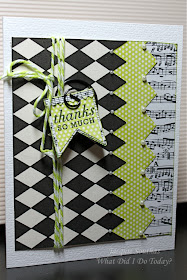
Papertrey Ink is one of my favorite sources for incredible stamp sets and dies and general inspiration. The challenge this month is to use this photo for inspiration and focus on black & white patterns along with the delicious pop of green.


Blog hop inspiration 

I picked up a great paper pad from Canva Corp a few weeks ago - it is full of black & white patterned paper. Partnering this with a scrap of green paper from the MME Lime Twist Life of the Party pad and one of my favorite musical note papers from Echo Park's Victoria Garden paper pad gave me the base for my card.


Just a second - isn't that 3 different patterned papers? Hmmm, I could enter this card in the PTI Make It Monday challenge {grin}!


I decided to emphasize the angles of the harlequin pattern by cutting along the black edge. The green paper was edged using a chevron die.


Two sizes of pearls from my stash embellish the edges of the paper.


I used the boxy banner from the PTI Banner Builder die collection and a stamped with a sentiment from the Mega Mixed Messages stamp set to create a sentiment tag.


The tag is adhered to a black circle paper clip that is wound into the baker's twine from the MME Lime Twist collection - glue dots hold them in place.


My zipper die has been used so often since I picked it up as soon as it was released, and will hide a gift card on this thank you card.


Because it was a little hard to see the zipper on this paper, I carefully folded the die cut and inked along the edge.


Thanks for stopping by and please poke around and see what else I have been up to,


Jacquie


Wednesday, May 23, 2012

my kind of quilting

I am back with another quilting card today for the Frosted Designs Fabulous Friday challenge and since this card also has three different patterned papers, I'm going to add it to this week's Papertrey Ink Make it Monday challenge.

I've moved on to making Father's Day cards.


The three papers are from Authentique's Free Bird collection and are cut into squares and mounted on another piece of patterned paper. Not all the papers from this pad looked good together, but these three were pretty easy to match. Both the dark green paper and the base paper do have a very subtle mottled pattern to them that gets lost in the small squares.

Because I wanted to have a complete row of the chevron pattern, the squares are a little over an inch.


Once I had the 3x4 pattern adhered, I trimmed the panel and ran the whole "quilt" through my Big Shot with a cuttlebug embossing folder. I love the way the embossing folder gives more dimension and texture to the panel, mimicing the stitching on a real quilt.


A metal piece anchors the hemp jewelry cord wrapped around the panel and a Tim Holtz charm clip dangles the sentiment tag.


I've really dug deep into old techniques - even an eyelet came out of hiding!

The sentiment tag was made by cutting 2 tags from the smallest Spellbinders Reverse Wonky Rectangle die. One die cut is trimmed along the embossing line and stamped with a sentiment from the PTI Daily Designs Sentiments stamp set.

The tag is adhered with a dimensional adhesive to pop it up a bit and keep it facing the right way.


Thanks for stopping by,

Jacquie


Monday, May 21, 2012

mixing patterned papers

This week's Make It Monday #67 from Papertrey Ink is Step-it-Up: Mixing Patterned Papers. I will admit to being very intimidated by patterned papers. Even papers that come from the same paper pad can leave me frustrated when trying to combine them.

I decided to take the challenge to heart and went through my paper stash until I found three that I thought went together. Following Betsy Veldman's advice on the video, I choose the busy pattern first and decide to use the bird & heart paper from Basic Grey's Kissing Booth paper pad.

My second choice was a green patterned paper from the Authentique Freebird series: it felt a little like a nest pattern to me.

The third paper was harder to pick - I didn't want to use pink, so went through my red and orange scraps to see what would fit and decided to use an orange scrap from the card I made last week. This is also an Authentique paper, but from the Delightful collection.


Sketches are great for helping with the layout of a card, but today I decided just to play around with the papers and see what happened.

With the end of the school year is in a couple of weeks, my selection of "thank you" cards needs to be replenished.


I used one of the PTI Half & Half dies to cut a base for my sentiment and added a few goodies. The bird is a Maya Road chipboard piece and musical note paper tape is from Tim Holtz.


The sentiment is from one of my most used stamp sets: Mega Mixed Messages from Papertrey Ink (of course!). A little dimensional adhesive helps lift the sentiment heart higher than the bird.


Thanks for stopping by,

Jacquie


Friday, May 18, 2012

inspired by jello cookies

Today I combined two challenges: the weekly MFTWSC sketch challenge at Splitcoast Stampers and the Tuesday Trigger at Moxie Fab World to create a multi-purpose card.

Here is the sketch,


and the finished card!


Obviously, the photo of the jello cookies inspired my color palette. OK, I can't help myself, I have to digress here - jello cookies?! I have never heard of these before, but the colors are so gorgeous, I might be tempted to make a batch just to display them - or maybe gift them with the card.

The designer papers are either from the Authentique Delightful pad or MME Miss Caroline Dolled Up. The paper pieced image is MFT's Who's That Birthday Girl and she sits on a couple of panels cut using the Die-namics Vertical Greeting II die.

Both the panel and the fussy cut image are adhered to the card base with dimensional tape, giving them a bit of a lift.


The sentiment is stamped on a Spellbinders Label 16 die - I deliberately kept the sentiment versatile so the card could be used for a graduation, congratulations or birthday celebration.


A few embellishments from my craft room finish things off: rickrack, baker's twine, button and rhinestone swirls.


The Chevron Strips Die-namic was used to cut a few scraps to finish off the inside panel, along with another neutral sentiment.


Thanks for stopping by and a huge thank you for those who have been leaving comments! 

I am shy about leaving comments on someone's blog when I don't "know" them and it really makes my day when someone leaves a little love here,

Jacquie


Thursday, May 17, 2012

felt flowers - PTI challenge

Papertrey Ink has another great Make It Monday challenge this week: use your border dies to make felt flowers. Ashley Cannon Newell's videos demonstrates the technique with a number of different border dies - the heart border creates a fabulous little flower!

I love the idea, but have more border punches than dies - if you have mastered cutting felt with a border punch, please let me know the secret.

I decided to give the challenge a try using my PTI rickrack border die and the banner borders die.

Here is my finished card.


I started with the banner border die, which let me play with a couple of different shapes.


The scalloped edge and the pinked edge borders both made small rose bud type flowers.

I wasn't expecting too much with the rickrack border die, but was curious about the shape that would come out if the diecut was cut in half to see what I would create.


I found that if I cut off the end "mountain" piece, the result was a pretty little rosebud.


I adhered the rosebuds to a piece of cardstock and then put the whole bouquet into a little white shopping bag.

The bag is tied with linen thread that is colored by inking it with Tim Holtz Dusty Concord Distress Ink. This linen thread is truly one of my most versatile embellishments - I can make it any color I want it to be with inks or markers.

The label is premade and has been lurking in my stash for a while and the sentiment comes from the PTI Mega Mixed Messages stamp set.

Want to see a close up of the bouquet?


I think my little flowers are okay, but I am loving the ones being linked to the challenge that are made 
with star and heart border dies!

Thanks for stopping by,

Jacquie


Monday, May 14, 2012

lace it up

A real life crafty friend, Lori (aka The Frugal Scrapper),  is on the Design Team at Frosted Designs, so I decided I'd better check out what they are up to.

This week the Fabulous Friday Challenge is to "lace it up" and I quickly discovered they didn't mean use trim or lace in a project. Head over to their blog to see the details.

I wanted to catch up on a couple of the MFTWSC sketch challenges that I missed, so created a card based on this sketch and the lace it up challenge.


All the designer paper is from either Echo Park This & That Graceful or MME Miss Caroline Dolled Up.


The sentiment is from the MFT à la mode Birthday Girl stamp set and is stamped on one of the Mini-Tab Die-namics (also MFT) that I cut two of and layered. 

Now we are getting to the "lace it up" challenge. I have some beautiful lace tape that I wanted to use and "lace" a ribbon through it to fulfill the requirements for the Frosted Designs challenge.


As always, I have to look at a couple of options before making a decision. I thought the chiffon ribbon would be too pale, the satin ribbon wasn't the right shade of pink and the Baker's Twine seemed too rustic. Turns out the chiffon ribbon was just right - showing up against the lace tape beautifully.

You can see in these photos how simple the lace tape is to work with - the backing just needs to be peeled off when you want to use it on a project.


I like to use a tapestry needle to thread things like this - it is sturdy, has a huge eye and a blunt point. A bit of adhesive will stick to the needle, but clean up is fast with a wet wipe.


I threaded right through the backing, but it is easier to remove if you thread between the backing & the lace {learning as I go}.


Have I mentioned how easy this lace tape is to use yet? {grin}

It lies nice and flat with no extra drying time on the finished card and, best of all, there are no bits of glue sticking through the holes of the lace!

My last step to finish the card was cutting two circles using a Memory Box die. As you can see, they are offset and adhered together with a glimmer misted Prima flower on top (yes, peeps - I glimmer misted!).


Thanks for stopping by,

Jacquie


Sunday, May 13, 2012

Mother's Day means Dim Sum Yum!

My dear family surprised me big time our first Mother's Day in southern California by finding a great dim sum restaurant.

It has become a tradition for us to go every year, and anyone who is a fan of good dim sum knows that waiting in line is part of the game. We will head down there in a few minutes armed with books and iPods, but the wait will be worth it.

While I'm off enjoying the dim sum delights, you can check out what I've been working on this weekend.

Dear daughter has a multitude of friends with spring and summer birthdays, so I'm trying to build a little stock of girly cards for her to choose from.

Once again, I used the MFTWSC sketch challenge as my starting point.


I followed the sketch pretty closely, using papers from the Echo Park This & That Graceful 6x6 designer paper pad. The stamp set is MFT's Who's That Birthday Girl, and I loved using the Mini-tab die again.


Instead of using ribbon or paper for the bottom panel running across the card, I layered a lovely soft green Washi tape with a zizag chevron pattern. I love the translucency of this tape!

It was easy to match up a second piece of tape to make the width I wanted - notice how the translucency changes with the layers. 


A few buttons from the stash embelish the bottom corner.

A little glitter pen highlights the flame on the candle. This was impossible to get a good photo of - May grey is the well kept weather secret of coastal southern California, but I didn't want to wait for the sun to come out to post {grin}.


Finally, I finished off the inside with scraps and another sentiment.


Hope you found some crafty time this weekend!

Thanks for stopping by,

Jacquie